27 March 2024

My OneStream Journey So Far...

This blog has been quiet for some time. That's largely because I've done quite a bit of writing (and experimenting!) for my employer, OneStream. If you're interested in that sort of thing, here's a brief list of my posts on the company blog:

Blogging about actual work stuff has been a lot of fun! And if you go reading those posts, check out other ones as well - some of the stuff my colleagues can do is just amazing. 

This said, the only constant in life is change. That means my contributions will probably slow down in the next few months, as I transition into a new role. Or maybe not! We'll see.

23 June 2022

How to add a tachometer to a Triumph Street Twin (2016-2019)

The Problem

I recently gave in to family tradition: I'm originally from Bologna, home of Ducati and heart of the Italian "Motor Valley", so sooner or later I had to buy a motorbike (or two, but nevermind).

As the main workhorse I went for a 2018 Triumph Street Twin, because it's practical but still fun, fairly cheap, and simply beautiful. I love it to bits, but one thing I really missed: a tachometer ("rev counter"). While trying their hardest to segment the Bonneville range, Triumph clearly thought that people would pay a few grand more and get a Speed Twin just so that they could see RPMs. It took them about 4 years to understand the silliness of this position (or to produce enough Bonneville variations that nobody cares about that bit anymore), so post-2020 Street Twins display RPMs on the digital display - in a pretty small way, but at least it's there.

The Solution

So, how could we go about adding a tachometer to pre-2020 models? Various web searches produced a few different methods, with a number of pitfalls. There are a few electrical schematics floating around, but I'm not good at that sort of thing and comments seemed to be that they are easy to get wrong.

A much easier method is to attach an OBDII ("OBD2") reader to the related port, which is available under the seat.

OBDII is a standard interface for debugging systems in vehicles; it's recently been mandated by the European Union, so it's available in pretty much any vehicle produced in the last decade or so. Once you connect a reader, you can see a wealth of information about the vehicle, from fuel consumption to engine load to pretty much any sensor available... including RPMs! So that's how we can get a tachometer without effectively modifying anything in the bike itself.

There are two ways to show the extracted information: wired, and wireless. Each comes with pros and cons.

Wireless (Bluetooth)

Wireless is less intrusive but fiddlier: a compact reader stays entirely under the seat, and communicates with a phone or tablet over Bluetooth (as far as I know, there are no dedicated wireless displays). It's described in this Youtube video, and the dongles are easy to find on Amazon. As a permanent solution, it suffers from lag and the requirement that the phone screen stays on all the time, set on the specific app. (Side note: I found the best iOS app to be FourStroke - most of them are focused on cars and might not even work with cheap aftermarket readers.) I have an old phone I mount on handlebars, but I typically want to use it to display GPS stuff and play music, so that just didn't work for me. You also have to manually open the app and connect every time, after you start the bike, which is annoying.

Wired

A wired solution, on the other hand, requires a bit more setup, but you do it once and that's it, you don't have to worry about it ever again; readings are a bit less laggy (although still not as quick as hardware ones), and leave your phone free to do other stuff. They typically also feature hardware controls, which are easier to use with gloves than touchscreens (yes yes, I have modern gloves - in practice, they are still too big to be precise).

There are a few OBDII readers on the market, largely meant for the car market. I grabbed this cheap thing from AliExpress, but there are equivalents on Amazon and so on. Setup is trivial: you connect it to the port, turn on the bike, and it just works, letting you choose what to display. You turn the bike off and the display shuts down automatically, so your battery is not drained. Nice!

Finding a location for the wire is basically the same as for the USB you also find under the seat; if you've wired it up to a handlebar mount for phones, as I have, you can basically do the same - it's actually easier here, since you can push it further back with the other cables.

Unresolved issues

There are a few annoyances though, due to the fact that this is fundamentally a product for cars:

  • The display can be a bit hard to see in daylight, particularly when the sun shines directly on it.
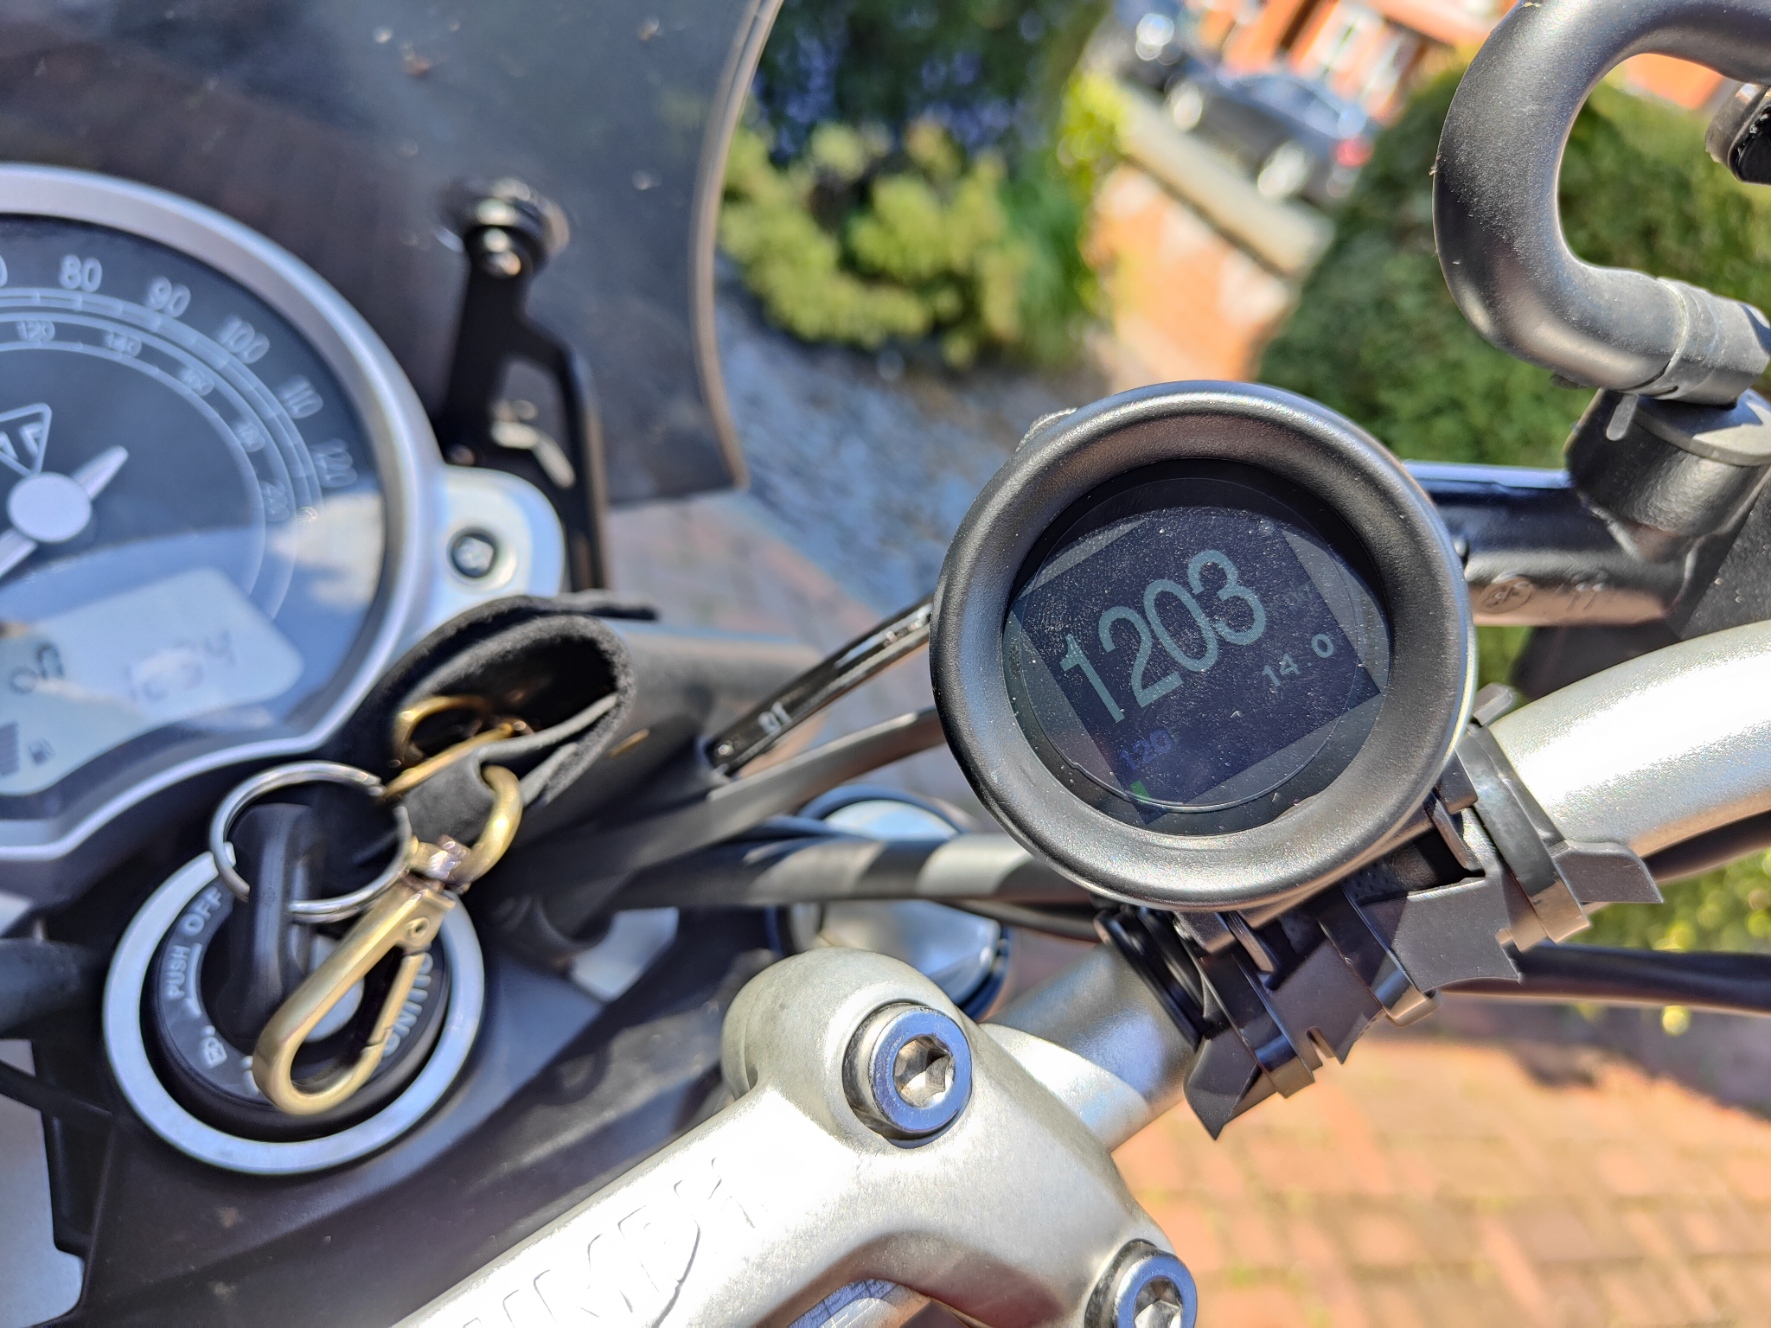
  • You'll need to hack together a mounting system; the stand that comes with the product is meant for car dashboards. You can see my solution in the pic of the display above - not the most beautiful, but it will do for now; I plan to revisit it at some point.
  • It's not waterproof. In the rainy North of England, this is a significant problem. I'm trying to think about solutions; if you have any suggestion, feel free to drop a comment.

All these issues could be solved if manufacturers started making readers dedicated to the motorbike market. I hope that happens at some point, because it would be awesome - it would free consumers from the tiranny of OEM displays.

Hot Engine is Hot

Last bit of advice: while you're testing, be careful with your dangling cables! As you can see from the pic below, I mistakenly left mine over the exhaust for a few seconds and... well. Amazingly, it still works!

30 May 2022

On OneStream

If you follow me on LinkedIn, you might have noticed that, about two years ago, I joined OneStream.

I've since refrained from writing about it, for a number of reasons: the product is massive, so it took a while to get to grasp with it; my new role kinda constrained what I could talk about; and I thought I wasn't particularly well-qualified yet to speak about the subject.

I recently attended the Splash conference for the first time. One of the things I brought home from San Antonio (together with a certain virus most people thought defeated) was the belief that, by now, I actually know a few things about OneStream - and there is a big hunger for that knowledge among clients and partners. The leadership is aware of this, so it was easy to get the greenlight on a few related projects.

This means that I'll be writing a bunch of posts in the next couple of months, on OneStream-related subjects. They might not be published here, but wherever they end up, I'll make sure to link them from here. I'm a geek, not a marketer, so they will be technical posts about getting stuff done; there is already plenty of material on why you should use OneStream for your planning and financial consolidation needs - what people need is to learn how you can do that, and that's where I'm going to help.

In the meantime, if you'd like me to cover a particular topic, feel free to reach out (here, on LinkedIn, or at my OneStreamSoftware.com address (glacava@).

12 March 2022

Detecting Badger2040 boards and automating uploads

I recently bought a bunch of Pimoroni Badger2040 boards, and they are a lot of fun.

The Badger is basically a small microcontroller (the Raspberry Pico) with an eInk display, in the size of a typical office badge. It has a few buttons you can interact with, when powered, but because of eInk it doesn't actually need to be powered all the time - you can just set it to the desired screen, turn off the battery, and the screen will stay as it was more or less forever.

The fun bit is that it can run MicroPython, so programming it is a breeze. You don't have to deal with all the scary vagaries of C/C++; just write your Python scripts, save them to the board, and run them. Sweet!

There is already a fairly comprehensive tutorial on how to get started with Badger2040, but (like most Pico-related documentation out there) it assumes you're happy to use Thonny, an editor focused on the micropython ecosystem, in order to move files to the board. With all due respect, Thonny is a very limited editor, and it gets recommended only because it's the most intuitive when it comes to managing files on the Pico. I'm much happier when I live in my beloved PyCharm, but its MicroPython plugin is somewhat limited and requires manual interaction, so I investigated a strategy to automate the basic stuff directly from Python on my laptop.

The first step is detecting the board. It appears to the operating system as a serial port, so we have to list the available ports and find the one that looks like our guy.

 # badgerutils.py
import serial.tools.list_ports as list_ports
from serial.tools.list_ports_common import ListPortInfo
  
def is_badger(port: ListPortInfo):
    """ decide if the port looks like a Badger2040 """
    # mac, but other systems will probably be similar,
    # just add other "if" blocks for windows etc
    if sys.platform.startswith('darwin'):
    	# you should be more thorough, 
        # might want to check VID etc, but this will do for dev
        if port.manufacturer and \
           	    port.manufacturer.lower().startswith('micropython'):
            return True
    return False
  
def get_badger():
    """ loop through all the ports and find our board """
    ports = list(list_ports.comports())
    for p in ports:
        if is_badger(p):
            return p

The next step is where things get a bit hairy. Interacting over the serial port is not everyone's idea of fun, so we better stand on the shoulder of geeky giants if possible. We could dig through Thonny's code, but it's long and complicated and meant to support a lot of scenarios we don't really care about. Instead, we can reuse a little utility called ampy, which is slightly old but fairly robust and (more importantly) self-contained and easy to understand.

Ampy includes a couple of modules to interact with a micropython board. You can have a look at the functions found in its cli module to figure how to wrap them, but here's a simple approach to start pushing files to the board - some of the code is lifted almost entirely from ampy.cli, but it's MIT-licensed, so you can do that (just mention the original copyright notice somewhere, if you publish it!).

# BadgerManager.py
  
from serial.tools.list_ports_common import ListPortInfo
from ampy.files import Files, DirectoryExistsError
from ampy.pyboard import Pyboard
  
class MyBadger(Pyboard):

    def __init__(self, port: ListPortInfo):
        super(MyBadger, self).__init__(port.device)
        self.files = Files(self)

    def upload(self, file_path: Path, dest_path: Path):
        """ upload file or directory to board """
        if file_path.is_dir():
            # Directory copy, create the directory and walk all children 
            # to copy over the files. 
            for parent, child_dirs, child_files in os.walk(file_path):
                # Create board filesystem absolute path to parent directory.
                remote_parent = posixpath.normpath(
                    posixpath.join(dest_path, os.path.relpath(parent, file_path))
                )
                try:
                    # Create remote parent directory.
                    self.files.mkdir(remote_parent)
                except DirectoryExistsError:
                    # Ignore errors for directories that already exist.
                    pass
                # Loop through all the files and put them on the board too.
                for filename in child_files:
                    with open(os.path.join(parent, filename), "rb") as infile:
                        remote_filename = posixpath.join(remote_parent,
                                                         filename)
                        self.files.put(remote_filename, infile.read())
        else:
            # File copy
            # check if in subfolder
            if len(dest_path.parents) > 1:
                # subfolder was specified
                # each parent has to be created individually,
                # because of ampy limitations
                for d in sorted(dest_path.parents)[1:]:  # first is /, discard
                    self.files.mkdir(d)

            # Put the file on the board.
            with open(file_path, "rb") as infile:
                self.files.put(dest_path.absolute(), infile.read())

    def ls(self, dirname='/', recurse=True):
        """ List files on board """
        dirpath = dirname if type(dirname) == Path else Path(dirname)
        return self.files.ls(dirpath.absolute(),
                             long_format=False, recursive=recurse)

Putting both things together we can interact very easily with the board like this:

from badgerutils import get_badger
from BadgerManager import MyBadger

# Note: in real life, remember to manage error conditions ! 
port = get_badger()
board = MyBadger(port)
board.upload("./something.txt", "/something.txt")
assert('/something.txt' in board.ls())

Happy hacking!

06 June 2020

Better access to special characters with AutoHotkey on Windows

EDIT 2020-06-21: I tweaked the layout a bit, and updated screenshot and scripts.

When you're trying to improve your typing skills, there are quite a few things you can do: learning to touchtype, getting an ergonomic / split keyboard, or moving to a better layout than QWERTY. However, if you're like me (small hands, short pinkie), chances are that none of these will be of much help when you have to type a lot of special characters, for example in programming. That's because special characters are typically hard to reach. Most layouts banish them to the edges of town, leaving them almost entirely to the right pinkie and to shift+<number>, which forces your hands to wander very far from the home-row on which your muscle-memory is based.

I'm currently experimenting with a solution to this state of things. Thanks to a wonderful little program called AutoHotkey, you can tweak your keyboard in great ways; what I decided to do was to leverage the largely-unused (but very easy to reach) CapsLock. I basically turned CapsLock into a new meta key (which is not Ctrl, Alt, AltGr, Win or Cmd), allowing me to get a completely blank layer that is independent of any existing key or shortcut. I then associated the most easily-reachable keys to the most common (and hardest to reach with typical layouts) special characters I need.

The result is that, by pressing capslock+<home-row-key>, I now get special characters with less effort and less wandering.

What you see above is the layout I'm currently using. It's not perfect, but the principles are:

  • optimize the position of keys I find least-reachable and most-used on a regular layout
  • privilege right-hand keys, which are the most natural companions to a left-hand meta
  • privilege opening brackets, as editors typically auto-close them
  • try to minimize "wandering" of hands from home-row as much as possible

I've also added a numpad on CapsLock+Shift, which is useful on laptop keyboards. Yes, you often have a hardware NumLock mode, but I never use it because I find it risky (if you mistakenly leave it on and the screen locks, good luck typing your password).

NOTE: the ALT+` combo is a "mac-ism" - it's actually AltGR+` on Windows (or Ctrl+Shift+Alt+`). It's the shortcut to prepend to a vowel to get a grave-accented character. I'm Italian, so I use it to type accents on a US keyboard.

I wish someone would come up with a "standard" meta-layout like this, with some real thought to ergonomics and frequencies; then again, programming languages can vary so much (for example there are lots of $ in Perl, but very few in Python) that I guess it would be difficult to appease everyone.

Here is a AutoHotkey script for QWERTY and AutoHotkey script for COLEMAK (that's actually what I use). If you install AutoHotkey, just save the script as AutoHotkey.ahk in the resulting installation folder and it will be automatically executed when you start the program (it can also be run at startup).

If you are on macOS/OSX, things are a bit more awkward; I might cover that in another post at some point, but my solution there relies on a smart external keyboard. Happy hacking!

03 April 2020

Django + PostgreSQL + Docker-Compose: a few gotchas

A lot of the tutorials out there make it look like it's trivial to set up a development environment with Django, Postgres and Docker. That never quite matched my experience; you always end up knowing too much about docker, and there are a few gotchas that most people typically fail to mention. The following are a few specifically related to Postgres and Django, which I'm writing here because I tend to forget them every time I start a new project...

A running container is not a running database

Docker-compose will happily report a container as "up" even though it's busy doing init work. With postgres, this means that a container might look "up" when really it's still creating the actual db instance, so app connections might well fail.

A good workaround is to use pg_isready, like this :

#!/usr/bin/env sh

docker-compose up
until pg_isready -d your_pg_db -h your_pg_host \
                 -p your_pg_port -U your_pg_superuser
do
    echo "Waiting for db to be available..."
    sleep 2
done
# now we can do actual work, like db migrations
...

Don't run; exec

A lot of howtos state, more or less, "if you want to run something in an instance, use docker-compose run some_machine some_command". This is misleading. run will create a new ancillary container, which will run in parallel to any other container of the same type that might already be up. If you want to execute an ancillary process inside an already-running container, use docker-compose exec some_machine some_command instead. This will ensure you are "logged on" the running container.

While coding, don't copy; mount

Many will tell you that you need to ensure reproducibility; and as such, your code should be copied or checked out to the instance in Dockerfile, i.e. at build stage. That is a huge drag on development, since you need to rebuild the whole image on every minor change. It is annoying and slow even with multi-stage builds.

Instead, you can mount your actual source directory as a volume, and exploit all the goodies that make development tolerable, like Django's autoreload features. Make your docker-compose.ymllook like this instead:

services:
   your_app_machine:
      volumes:
         - type: bind
           source: /host/location/of/src
           target: /container/location/of/app
   ...

When you want to run tests or go to production, use a second Dockerfile that inherits from the first (with FROM) and actually copies data (or more likely checks it out via git), without the volume definition.

Know your tools

This is not really specific to docker! Master your tools in depth, it will help. I honestly didn't know that JetBrains PyCharm can now configure the interpreter running in a Docker container as the main one for the project, which makes a lot of things easier (debugging, REPL etc). Extremely helpful!

06 February 2020

Announcing the AutoEPM Patch Tracker

UPDATE: This service has been discontinued; this post is left as historical reference. If you need this sort of thing, contact me on LinkedIn.

With the recent release of EPM 11.2, I thought it would be a good time to make public a tool I've built and used "behind the scenes" for quite some time, the AutoEPM Patch Tracker.

It's a patch tracker focused on EPM products, automatically aggregating updates and pointing to readmes, hopefully a bit faster to peruse than My Oracle Support. It also recommends Critical Product Updates that can be applied to the EPM stack, and the most common "standard" updates (only for 11.1.2.4 at the moment). With a free account via LinkedIn sign-on, all lists can be downloaded in CSV, JSON, and XML (Atom).

It's only a small showcase of what we can do at AutoEPM by Targlet. If you'd like to find out how to integrate this level of automation and intelligence to your EPM enviroments, feel free to reach out! I'll be at OpenWorld London next week as well, always happy to have a chat.

10 January 2020

Oracle Hyperion EPM 11.2 - first impressions

Last month, Oracle finally released the long-awaited on-premises release of EPM 11.2, rumoured to be the last hurrah for the venerable suite. After a couple of test installations, I have a few thoughts from an infrastructure perspective.

First, the bad news:

  • This is very much a .0 release, in many ways the first since 11.1.2.0 (the last time so much of the infrastructure had substantially changed). It is rough in quite a few places, and configuration is not for the faint of heart.
  • I have encountered what, to me, looks like a blocking bug in multi-server configurations. I filed a support request with Oracle and will see how it goes. At the moment I simply wouldn't be able to recommend it in situations where high-availability is necessary.
  • Even after configuration, it is harder to operate by non-techies than in the past. Even the "start" and "stop" links provided, which used to be ok for single-machine use at least, are not sufficient anymore - some extra scripting will be necessary to make it useable even in the most basic scenarios.
  • Documentation has not fully caught up with 12c, particularly in the area of additional configuration tasks for Financial Close Manager (which was already pretty lacking). Some of the additions, to deal with the now-necessary Repository Creation Utility, are ambiguous.
  • Weblogic seems hungrier for memory than in previous releases. This might be due to 12c, or to the fact that it's now using Java 8 under the hood - I had already measured an increase in this area when replacing Java 6 with 7 on 11.1.2.4.
  • Essbase seems to have been shipped almost unmodified from the latest 11.1.2.4 version. Among other things, this makes it currently impossible to do a full-SSL configuration if Essbase is in the picture. It's disappointing, particularly considering how Essbase customers are typically among the few who often require fully-encrypted solutions.
  • The documentation seems to state that running any "Configure Database" task more than once will end in failure. I suspect this is true only for certain components, but I have not had the time yet to explore this area. This makes it even harder than before to migrate databases after configuration, so make sure you take design choices that will stand the test of time.
  • EPMA lives! Well, not really - the product is gone, but somehow it's still avilable in the Provisioning screen and you can assign roles for it. ๐Ÿคท๐Ÿป‍♂️
  • This is the end of the line for IIS stalwarts. Using IIS as front-end webserver will simply not work (according to docs).
  • It's not particularly clear whether Oracle 18c and 19c are officially supported as database. In practice they seem to work (after all, they are really 12.2.0.2 and .03 rebranded), but it would be nice if the matrix was clarified.

But there are also some good news!

  • The products themselves are basically the same, with the occasional extra feature. Users shouldn't need any substantial retraining, with the notable exception of any EPMA or Interactive Reporting power-users still around.
  • The 12c stack, in theory, unlocks a number of attractive possibilities for system administrators and implementors - containers, no-downtime patching, and so on. It will take some time to fully unpack how EPM can take advantage of these goodies.
  • Recent Windows Server releases are supported.
  • In my test, everything seems to work even with the free editions or Oracle and SQLServer (XE 18c and Express 2017), which is nice for consultants and other professionals.
  • Both 12c and Java 8 support modern crypto standards, which should make things less awkward when risk-assessing and pentesting.
  • Java 8 brings a lot of improvements to the language and the ecosystem. Whole classes of problems have been removed (MaxPermGen, anyone?), which should make services more reliable and performant. Custom integrations will also be easier and faster to develop and run.

In the past, I would have expected such a release to be followed by a quick stream of fixes, necessary to make it actually fit for production use. We will have to see if it is going to be the case here, considering how long it took to debut and the overall tone of the Oracle roadmap (mostly cloud-focused). Should Oracle really commit to improving the on-premise, this release would soon prove itself as a substantial improvement over 11.1.2.4.

If you'd like to know more and discuss your options in the EPM space, make sure to get in touch with us.

18 June 2019

How to dump macOS security-rights database

macOS handles some security items in a custom database, which may or may not be SQLite. The official way to interact with such database, outside of Objective-C, is the /usr/bin/security utility, with the parameter authorizationdb and specifying the required operation on the class of rights, e.g. security authorizationdb read system.login.console

Unfortunately, there is no way (that I could find) to simply list all classes. I was trying to uninstall something that might have had references in that db, but I wasn't sure about the class it might be registered under, so I wanted to dump them all.

Luckily I found what looks looks like a comprehensive list of rights. After a quick scraping job with Python, I had a list that I could use like this:

cat osxrights.txt | xargs -I % sh -c 'sudo security authorizationdb read %' | grep -B 10 myAnnoyingItemToRemove

... and the bundle wasn't anywhere, so I could just chuck it.

(Note: had the item been found, I would have had to dump the whole security class to a .plist file with security authorizationdb read the.class > my.plist , edited the file to remove it, then write it back to the db with security authorizationdb write the.class < my.plist )

14 March 2019

How to remove all bars in fullscreen mode in Firefox on MacOS/OSX ("kiosk mode")

Procedure

If you want to remove all toolbars from Firefox in fullscreen mode on Mac, this is the procedure:

  1. Type about:config: in the location bar to open advanced settings. (If it is the first time you do it, you might have to click "confirm" or something like that in the scary screen that comes up first.)
  2. search for full-screen-api.allow-trusted-requests-only and double-click the line that is found, so the value changes to false
  3. Bring up the Bookmark Toolbar if you don't have it (menu View -> Toolbars -> Bookmark Toolbar)
  4. Right-click on empty space in the Bookmark Toolbar, and select New Bookmark...
  5. In the Name field, type something like "Enter Fullscreen" (it doesn't really matter, just don't leave it blank)
  6. In the Location field, enter the following line:
    javascript:document.getElementsByTagName('html')[0].mozRequestFullScreen();void(0)
  7. Click Add to save the bookmark.
Now, when you click on that bookmark, Firefox will go "real fullscreen", hiding all toolbars. To get them back, you will have to press ESC.

Now, there is a bit of a snag. That preference in about:config: is set to true by default for a reason: it is a bit unsafe to allow any website to use fullscreen-enabling javascript. For this reason I would suggest to only do this for limited periods, then switch it back once you're done.

Long-winded explanation

FF has a preference, browser.fullscreen.autohide, that in theory should govern the behaviour of toolbars when going fullscreen. It is set to true by default, meaning toolbars should disappear. However, for some reason this property has (almost) always failed to work on MacOS/OSX builds of Firefox.

There used to be a few extensions that corrected that behaviour, but they've all gone away when Firefox switched to WebExtension APIs, which basically sandboxed extensions more rigidly and blocked them from changing the browser interface as deeply as they could before. This was the price for the dramatic performance improvement seen in Firefox 57+.

This workaround hence relies on the new Fullscreen WebAPI, which is supposed to be a new, standard way to enable fullscreen via Javascript on any browser (well, any browser that implements it - just a few at the moment). However, because of security concerns, this API is locked down by default; so, in order to use it, we first have to relax checks as described above. Once that is done, we can launch a bit of JS from a bookmark that triggers "real" fullscreen.

Credit to this AskDifferent post where I first found the trick.

11 February 2019

How to customise Jetty embedded in Spark Java framework

EDIT: I uploaded a full working example, ready to be customized, on github. If you just want a working solution, go there. Otherwise, keep reading for the explanation.

When it comes to Java microframeworks for API development, I've been using Spark for some time in a couple of different projects. For most casual needs, it works out of the box; however, there are circumstances where the "easy" options for configuring the embedded Jetty instance, are simply not enough. In that case, you have to take control and basically replace the instance with one that you completely control.

Due to how Jetty works, there are multiple moving parts: the server takes care of things like thread pools, the socket is responsible for SSL and other low-level protocol stuff, and the handler is where you do high-level middleware (changing headers etc). This means that you might need several factories to take care of all these. The good news is that Spark is granular enough that you can (more or less) limit yourself to what you need. The main pattern is: there will be a factory for each element, with a create() method returning an interface; you implement the interface and swap out the default factory with your own. However, these factories at the moment (Spark 2.8) are somewhat nested, so depending on where you need to work, you might have to replace a bunch of classes before you hit the point you're interested in.

The main entry point is EmbeddedServers.add(identifier, serverFactory). This is what you'll call from the main() method you use for all the post() and get() configuration directives. It is important that EmbeddedServers should appear right at the top, before any other configuration directive, otherwise Spark will use its default factory. It should look more or less like this:

EmbeddedServers.add(
     EmbeddedServers.Identifiers.JETTY, 
     new MyWonderfulServerFactory());

For the identifier, we re-use the default one because otherwise Spark will take over again. Nothing to do there.

The server factory is where real work begins. Your class (or lambda) needs to implement the spark.embeddedserver.EmbeddedServerFactory interface, which has one method:

public EmbeddedServer create(
            Routes routeMatcher, 
            StaticFilesConfiguration staticFilesConfiguration, 
            ExceptionMapper exceptionMapper, 
            boolean hasMultipleHandler)

As a starter, you can copy the content of spark.embeddedserver.jetty.EmbeddedJettyFactory as-is. You don't need constructors (unless you want them). Strictly speaking you don't need withThreadPool() and withHttpOnly() methods either, but I suggest you keep them anyway; just change the return type to match MyWonderfulServerFactory.

Create() does three things:

  1. Initializing the route matcher, which you probably don't want to touch;
  2. Initializing the Jetty handler for that matcher, which you may want to configure for things like header manipulation and other middleware;
  3. Creating the embedded server, which is likely what you are after.

I will assume we want to tweak n.3. The main place where to pay attention is this line at the end of create():

return (new EmbeddedJettyServer(this.serverFactory, handler)
        ).withThreadPool(this.threadPool);

This will return the default configuration, and we don't want that. So we change it to something like:

return (new MyWonderfulEmbeddedServer(handler)
        ).withThreadPool(this.threadPool);

Now we need a MyWonderfulEmbeddedServer class, which should implement spark.embeddedserver.EmbeddedServer. Again, as a starting point, you can copy spark.embeddedserver.jetty.EmbeddedJettyServer, and change the return types to match. I also suggest you get rid of the factory parameter in constructor and the related field, which adds a bit of unnecessary complexity. That factory is actually used only in one place:

if (this.threadPool == null) {
    this.server = this.serverFactory.create(
       maxThreads, minThreads, threadIdleTimeoutMillis);
} else {
    this.server = this.serverFactory.create(this.threadPool);
}

Which you can replace with the following (straight from spark.embeddedserver.jetty.JettyServer):

if (this.threadPool == null) {
    if (maxThreads > 0) {
       int min = minThreads > 0 ? minThreads : 8;
       int idleTimeout = threadIdleTimeoutMillis > 0 ? threadIdleTimeoutMillis : '\uea60';
       server = new Server(new QueuedThreadPool(maxThreads, min, idleTimeout));
    } else {
       server = new Server();
    }
} else {
    this.server = threadPool != null ? new Server(threadPool) : new Server();
}

It's a bunch of stuff related to the amount of threads and timeouts. If that's what you were trying to configure, btw, this is where you can do it. To be honest, I believe Spark developers intended that the "proper" way, to do that particular customisation, would be to keep the factory parameter as it is, implement your own alternative to the badly-named JettyServer class -- it should be something like JettyThreadConfigFactory, really -- which implements the similarly badly-named JettyServerFactory, and pass it to the constructor in MyWonderfulServerFactory.create().

In my case, though, I was after an SSL customisation, and for that I had to swap out yet another factory, spark.embeddedserver.jetty.SocketConnectorFactory, mentioned in the second half of this block:

ServerConnector connector;
if (sslStores == null) {
    connector = SocketConnectorFactory.createSocketConnector(
         this.server, host, port);
} else {
    connector = SocketConnectorFactory.createSecureSocketConnector(
         this.server, host, port, sslStores);
}

In this case there is no interface, you can just extend the existing class with what you need. I wanted to enforce a particular set of SSL ciphers and protocols, so I overrode createSecureSocketConnector() adding the following bits:

sslContextFactory.setExcludeProtocols("SSLv3", "SSLv2", "TLSv1.2");
// first we clear existing exclusions
sslContextFactory.setExcludeCipherSuites(new String[]{});
// then we re-add what we need
sslContextFactory.setIncludeCipherSuites(bigArrayOfCipherNames);

And that's it. Now you know how to instantiate your own Jetty instance for Spark. It's a bit convoluted, and hopefully a "spark 3" will give us a better architecture to work with, one day. In the meantime, this is how you can do it.

26 November 2018

How to get Google Home / Google Assistant to call your iOS iPhone

If you have an iPhone, Google Assistant and Google Home won't be able to call or ring your phone out of the box, since it's an Android-only feature. If you are not in the US, you cannot even use the workaround of calling your number. So what can you do, if you tend to misplace your phone around the house ? (ahem)
  1. Get an account on IFTTT
  2. Install the IFTTT app on your phone
  3. create a new applet, click on "this" and select Google Assistant
  4. select "say a simple phrase"  and enter the details you prefer (e.g. "make a noise on my phone" or "ping my phone". Note the most common "ring my phone" or "where is my phone" are reserved by Google and won't work).
  5. click on "then" and select VoIP Calls
  6. enter a message the phone will tell you if you pick up (e.g. "Glad you found me!")
  7. Save the applet.
Now, when you say that phrase to Google Home / Goole Assistant, it will ring your phone, so you can dig it out of the sofa or the Lego box (ahem).

15 August 2018

how to load initial data and test data in Django 2+

There are two ways to automatically load data in Django:

  • for data you need while running tests, place xml/json/yaml files in yourapp/fixtures.
  • for data you need while setting up the database from scratch, or at specific points in time, you must create a Migration

This is a bit annoying, because chances are these locations will get out of sync sooner or later, and it duplicates effort if you do reproducible builds, docker, and stuff like that.

The solution is to create a migration that actually loads fixtures. So:

  1. Create your fixtures: manage.py dumpdata --output yourapp/fixtures/yourmodel.json yourapp.YourModel
  2. Create an empty Migration: manage.py makemigrations --empty yourapp
  3. Edit the resulting migration (the last file created under yourapp/migrations, making it look like this:
    from django.db import migrations
    
    def load_fixtures(apps, schema_editor):
        # This is what will be executed by the migration
        from django.core.management import call_command
        # this is the equivalent of running manage.py loaddata yourmodel.json
        for fixture_name in ['yourmodel']: # add any additional model here
            call_command("loaddata", fixture_name)
        # add other calls if you have multiple models
    
    def rollback(apps, schema_editor):
        # This will be executed if you rollback the migration, so you want to clean up
        for model_name in ["YourModel"]:  # add any additional model here
            model = apps.get_model("yourapp", model_name)
            model.objects.all().delete()
    
    class Migration(migrations.Migration):
        dependencies = [
          # ... don't touch anything here ...
        ]
    
        operations = [
            migrations.RunPython(load_fixtures, rollback),
        ]
    # -*- coding: utf-8 -*-
    
  4. Profit

Note that this does not remove the option to have data that is available only in certain situation: just don't list the fixtures you don't want in the migration, and vice-versa.

24 May 2018

How to securely wipe an NVMe drive

NVMe drives are great: they are fast and they are huge. That huge size, however, can be a pain when it comes to securely erasing data. Old-school commands like wipe are simply not up to the task; and even if they were, they work on assumptions that do not map properly to a solid-state world. Writing random data over and over is going to dramatically reduce the lifespan of a solid-state drive, and it's pointless when all NVMe disks already have built-in tools that can take care of this task quickly and safely.

So what do you do when you want to wipe a NVMe drive?
  1. Download a recent Linux distribution. I would recommend Debian/Ubuntu or one of their smaller derivatives (like Knoppix). Burn it on a cdrom or USB drive and boot the system from it.
  2. Make sure your package manager is up-to-date (under Debian/Ubuntu, sudo apt-get update), then install nvme-cli (sudo apt-get install nvme-cli)
  3. If your drive is a Samsung, it now has to be put to sleep (you can do that with sudo systemctl suspend) and then woken up. This is a weird bug that Samsung doesn't seem in any hurry to fix.
  4. Now you can securely wipe the disk: sudo nvme format -s1 /dev/nvme0n1
For the curious: the -s option triggers Secure Erase mode, which can be set to 1 (wipe) or 2 (delete encryption keys for encrypted data). 1 looks like the safest option, because it will automatically do what 2 does if it detects that all data is encrypted. Reference here.

The latest NVMe specification adds other commands, to scrub every nook and cranny (bus caches etc), but as far as I know they have not been implemented yet.

15 May 2018

New Beginnings

So, after 7 intense years at Infratects (now Inlumi), it's time for me to move on.

I have a few ideas about what to do next, but nothing set in stone yet. My LinkedIn profile could do with more details, but it's a decent primer for what I do for a living - Hyperion/EPM, Python, Java, Weblogic and thereabout.

I was a web developer in a previous life, so I enjoy hacking and automating everything, getting dirty with infrastructure and the cloud; and in 13 years working on Hyperion products, I've absorbed a pretty good amount of knowledge related to financial processes (consolidation rules, metadata, cube performance and so on) as well as a deep understanding of the innards of the EPM suite. I can tweak your database, hack your Weblogic, integrate your cloud-based authentication, script your exports and migrations, and so on; and if there is something the tools won't do... I'll build you a new tool! That's where I make the difference: at the intersection of technology and Finance, boosting the productivity of accountants.

If this sounds interesting, ping me on LinkedIn and we can have a chat.

16 April 2018

Nespresso Blends - a comprehensive spreadsheet

As a faithful Nespresso user, I was a bit shocked last month when I discovered one of my favourite blends contained Robusta. I had always assumed all blends were 100% Arabica and alas, that was not the case. So I started looking up what is what, but I was quickly overwhelmed - I wasn't going to browse through 24 pages of slow-loading images to read all blurbs. Enter Python.

As it often happens, the situation degenerated quickly. The result is an Excel spreadsheet (also available in Google Docs), listing all attributes of all blends so that you can filter out what you need. Decaffeinated varieties are highlighted, because that's not real coffee ๐Ÿ˜

28 March 2018

How to implement custom BotStorage class for Microsoft BotFramework

Since launch, the MS BotFramework has been changing very rapidly. So rapidly, in fact, that I recently gave up trying to keep up with my handrolled Python, and embraced (sigh) their NodeJS SDK. At least now I won't have to worry when they break stuff, right ?
One of the most recent BF changes is the deprecation and eventual removal of the default persistence API. You are now supposed to either use one of the pre-built Azure services (paying $$), or provide your own implementation. In pure Microsoft style, they state that rolling your own is very easy... but never actually provide a sample or even tell you which interface should be implemented.
I had to scavenge through their code to figure it out (at least they opensource their stuff these days), but I thought I'd save others a bit of aggravation, and here it is:
var MyBotStorage = (function () {
    
    // optional constructor
    function MyBotStorage(options) {
        this.options = options;
    }
    
    MyBotStorage.prototype.getData = function (iBotStorageContext, 
                                                callback){
        // IBotStorageData interface
        var data = {
            userData: {},
            conversationData: {},
            privateConversationData: {}
        };
        // the callback MUST be invoked
        // signature: callback(Error, iBotStorageData )
        callback(null, data);
    }
    
    MyBotStorage.prototype.saveData = function (iBotStorageContext, 
                                                iBotStorageData, 
                                                errorCallback){
        // the callback MUST be invoked
        errorCallback(null);
    }
    
    return MyBotStorage;
}());

var botStorage = new MyBotStorage({});

var bot = new builder.UniversalBot(connector, function (session) {
            // your bot code here
    }).set('storage', botStorage); 
As you can see, it is indeed trivial, once you know how. It's sad that MS somehow, in the haste of deprecating their older interfaces, couldn't find the time to put this sample in their otherwise-extensive documentation. I suspect the fact that Azure is not mentioned anywhere might have something to do with it, but I'm sure I'm just assuming excessive malice and there is a perfectly-plausible explanation that does not involve greed. Or is there?

26 March 2018

Appstores need a Trial Mode

I've been looking for a while for a Windows-native Twitter client that could sync with my other non-Windows devices (aka "supporting TweetMarker"). I've found one that claims to do that, Tweet It!, but there is a problem: it costs £3.5 upfront. That's a relatively high amount of money to throw down a well hoping that my wish will come true. However, because this feature is so rare, if it worked I'd be happy to pay three times as much, no questions asked. I just have no way to find out.

Appstores need a simple Trial Mode. All the current hacks (In-App-Purchases, subscriptions, refunds etc) are just that, clumsy workarounds to this glaring omission, which is why app prices are so squeezed down - to the chagrin of indie developers. Trial Mode would also bring huge collateral benefits like reducing reliance on SaaS services (something that Microsoft in particular should relish) and creating viable alternatives to the free-to-play bubble that has turned online gaming into a socially-accepted form of gambling addiction.

I doubt Apple will ever introduce Trial Mode - they are the dominant player and have little incentive to change the rules; and Android is a far west where the Play Store is almost irrelevant. But Microsoft should experiment with something like this, while the Windows Store is still young and evolving. Both developers and users would love it, they have been asking for something like this for years.

04 March 2018

The European Union, explained to geeks

I've started describing the EU to geek-friends as a set of services built over decades.
  • You need to coordinate energy supplies across the company departments (nations)? We built a service (ECSC) that does that. Worked great, no more fighting over the last bit of coal!
  • Need atomic development? EURATOM service. Worked great, again.
  • And so on and so forth...
  • At some point somebody said hey, we need a management tool for all this stuff! "European Council" service, with a set of dedicated subthreads for the real work (European Commission).
  • But that service will run amok at times, let's add some monitoring and security checks! EuroParliament service - took a few rewrites to get right, nobody really likes to work on monitoring tools; but like systemd on Linux, the EP service should eventually take over anything that talks to real world I/O, so it's pretty important.
  • Now all this stuff needs to communicate, with common formats that avoid parsing and reparsing umpteen different types of data back and forth, and ways to look up the right service for a given job - so we created a "CommonMarket SDK", optionally turbocharged with options like Schengen. When exceptions are thrown, the SDK will automatically invoke the ECJ service to resolve matters; and it will self-update by talking to the management services. Once everyone adopts the SDK, then it should be easier to make more radical changes through that (ECB, Euro, common fiscal policy...). But in the end nobody likes change, it's always hard to break backward-compatibility.
Now, across the company/continent, various departments/nations have adopted some or all of these services, but most of them ended up relying on the SDK one way or the other, so it became basically mandatory. At one point we had to give a name to the whole framework, and "EU" it was.
It's definitely not a monolith, but there are so many moving parts that the management services are now essential. Some departments have renounced their Write access (Iceland, Norway, Switzerland...) and some were never granted that privilege (Turkey); some departments were forced to change their processes to suit the framework (Italy, Greece, the Eastern countries...). Things are still pretty shaky, developers are still very much at work, but it's getting better with time. It's making more and more services possible and even *easy* to bootstrap (EMA, EFSA, Erasmus...). Bugs creep in and out, we keep adding more and more fault-tolerance, the workload is not yet distributed fairly, etc etc; but it's accomplishing some very heavy tasks that are absolutely mission-critical, if we want to keep the company running and competing with the big boys.
...
Then, one day, a department said they'd like to go back to pen and paper. Except for a few services, for which they want to hand-craft packets individually, but those services should just assume the data is still as good as before, and never throw exceptions - they will ignore any response from the ECJ service anyway. Some of what their department does depends on another department, which has no intention to go back to pen and paper, but they say they will somehow give them bits and receive paper, without anyone actually doing the transformation, and without any friction at all. And they'd like to retain write access to the management services too, thank you very much, plus veto powers, so nobody can change SDK formats without consulting them.
Cue facepalming.

25 January 2018

Windows Survival Kit for OSX exiles

After 5 long years, I was gently forced back to Windows for everyday work. The experience has been less terrible than I thought, but was pretty frustrating at the beginning.
To help anyone in the same predicament, I put together a small list of tips to make the move a bit more tolerable.
  • Windows does not have hot corners. Hello, 1995! Anyway, the solution here is using a small app called, unsurprisingly, HotCornersApp. It works well enough, and it's fine with multiple screens too. Despite the basic website, it's legit and even opensource, you can compile it yourself (although beware - apparently the very latest updates may not build properly).
  • Windows does not do text substitution, which is one of those things that you don't know how much you love it until they take it away from you. As far as I can see, there is no free utility on Windows to do this, or nothing that actually works well enough. So, I paid for Breevy. It feels a bit retro (it looks blurry on high-def screens...), but it works very well and has all sorts of options and special features.
  • Windows doesn't really deal well with multi-language support, aka typing accents from a US keyboard. Sure, you can use US-International, and deal with ' and " becoming meta-keys, but for a techie/programmer typing those characters on their own more often than accents, it's extremely annoying. The solution was again Breevy: you can define a combo that will not be triggered unless you type a special character afterwards. For example, I defined `e to become รจ after I press Ctrl. It works absolutely everywhere, although it's nowhere as elegant as the OSX popup. Same story for special characters like £ , € etc.
    • For best results, check if your keyboard supports custom macro. Mine does, so I mapped the blank side-keys to accents and so on. After muscle-memory starts kicking in, this solution is actually superior to stock OSX.
  • I was not going to reformat my external hard drives to NTFS, which is a pain to use back on OSX; so again I had to pay for Paragon HFS+ for Windows. The UI is garbage (and does not work properly with multi-monitor setups), but the actual driver seems to work perfectly.
  • Microsoft has basic print-to-PDF support. If you need to concatenate documents, PrimoPDF does it, and it's free (do not download the Nitro version). The interface is not great though.
  • For the developer types out there who rely on Dash, a good equivalent on Windows is Zeal. It supports the same format, even fetching docsets directly from Dash repositories.
  • Also for developer/sysadmin types, the Windows equivalent of homebrew is now Chocolatey. Whoever came up with that word should give up trying to name things, but the software does work. You can use it to install 7zip (to get the latest beta with proper security patches, choco install 7zip.install --pre -y) windirstat and so on, it will make it easy to upgrade them when necessary (rather than having through the usual website-download-install dance, just choco upgrade them all).
  • There are quite a few apps that do what Fluid does, i.e. making websites into "native" apps. I know, I know, they are aberrations; but I got used to having a few sites (Gmail, Trello, Hangouts...) accessible this way. After a bad experience with WebCatalog (it was working ok, but then it got stuck trying to upgrade itself), I installed nativefier. This is again more for the geek types; it requires npm and it's a command-line app with a few quirks.
  • UPDATE 1: to get back the "preview on pressing Space" experience, there is a free app called Seer. You can also pay for a license, but it's not clear what the difference might be, the free app is more than enough for my needs. I had to remove the Ctrl-Alt-S shortcut in Settings in order to make it work properly.
Did I miss anything? Feel free to suggest other useful tidbits in comments.