23 June 2022

How to add a tachometer to a Triumph Street Twin (2016-2019)

The Problem

I recently gave in to family tradition: I'm originally from Bologna, home of Ducati and heart of the Italian "Motor Valley", so sooner or later I had to buy a motorbike (or two, but nevermind).

As the main workhorse I went for a 2018 Triumph Street Twin, because it's practical but still fun, fairly cheap, and simply beautiful. I love it to bits, but one thing I really missed: a tachometer ("rev counter"). While trying their hardest to segment the Bonneville range, Triumph clearly thought that people would pay a few grand more and get a Speed Twin just so that they could see RPMs. It took them about 4 years to understand the silliness of this position (or to produce enough Bonneville variations that nobody cares about that bit anymore), so post-2020 Street Twins display RPMs on the digital display - in a pretty small way, but at least it's there.

The Solution

So, how could we go about adding a tachometer to pre-2020 models? Various web searches produced a few different methods, with a number of pitfalls. There are a few electrical schematics floating around, but I'm not good at that sort of thing and comments seemed to be that they are easy to get wrong.

A much easier method is to attach an OBDII ("OBD2") reader to the related port, which is available under the seat.

OBDII is a standard interface for debugging systems in vehicles; it's recently been mandated by the European Union, so it's available in pretty much any vehicle produced in the last decade or so. Once you connect a reader, you can see a wealth of information about the vehicle, from fuel consumption to engine load to pretty much any sensor available... including RPMs! So that's how we can get a tachometer without effectively modifying anything in the bike itself.

There are two ways to show the extracted information: wired, and wireless. Each comes with pros and cons.

Wireless (Bluetooth)

Wireless is less intrusive but fiddlier: a compact reader stays entirely under the seat, and communicates with a phone or tablet over Bluetooth (as far as I know, there are no dedicated wireless displays). It's described in this Youtube video, and the dongles are easy to find on Amazon. As a permanent solution, it suffers from lag and the requirement that the phone screen stays on all the time, set on the specific app. (Side note: I found the best iOS app to be FourStroke - most of them are focused on cars and might not even work with cheap aftermarket readers.) I have an old phone I mount on handlebars, but I typically want to use it to display GPS stuff and play music, so that just didn't work for me. You also have to manually open the app and connect every time, after you start the bike, which is annoying.

Wired

A wired solution, on the other hand, requires a bit more setup, but you do it once and that's it, you don't have to worry about it ever again; readings are a bit less laggy (although still not as quick as hardware ones), and leave your phone free to do other stuff. They typically also feature hardware controls, which are easier to use with gloves than touchscreens (yes yes, I have modern gloves - in practice, they are still too big to be precise).

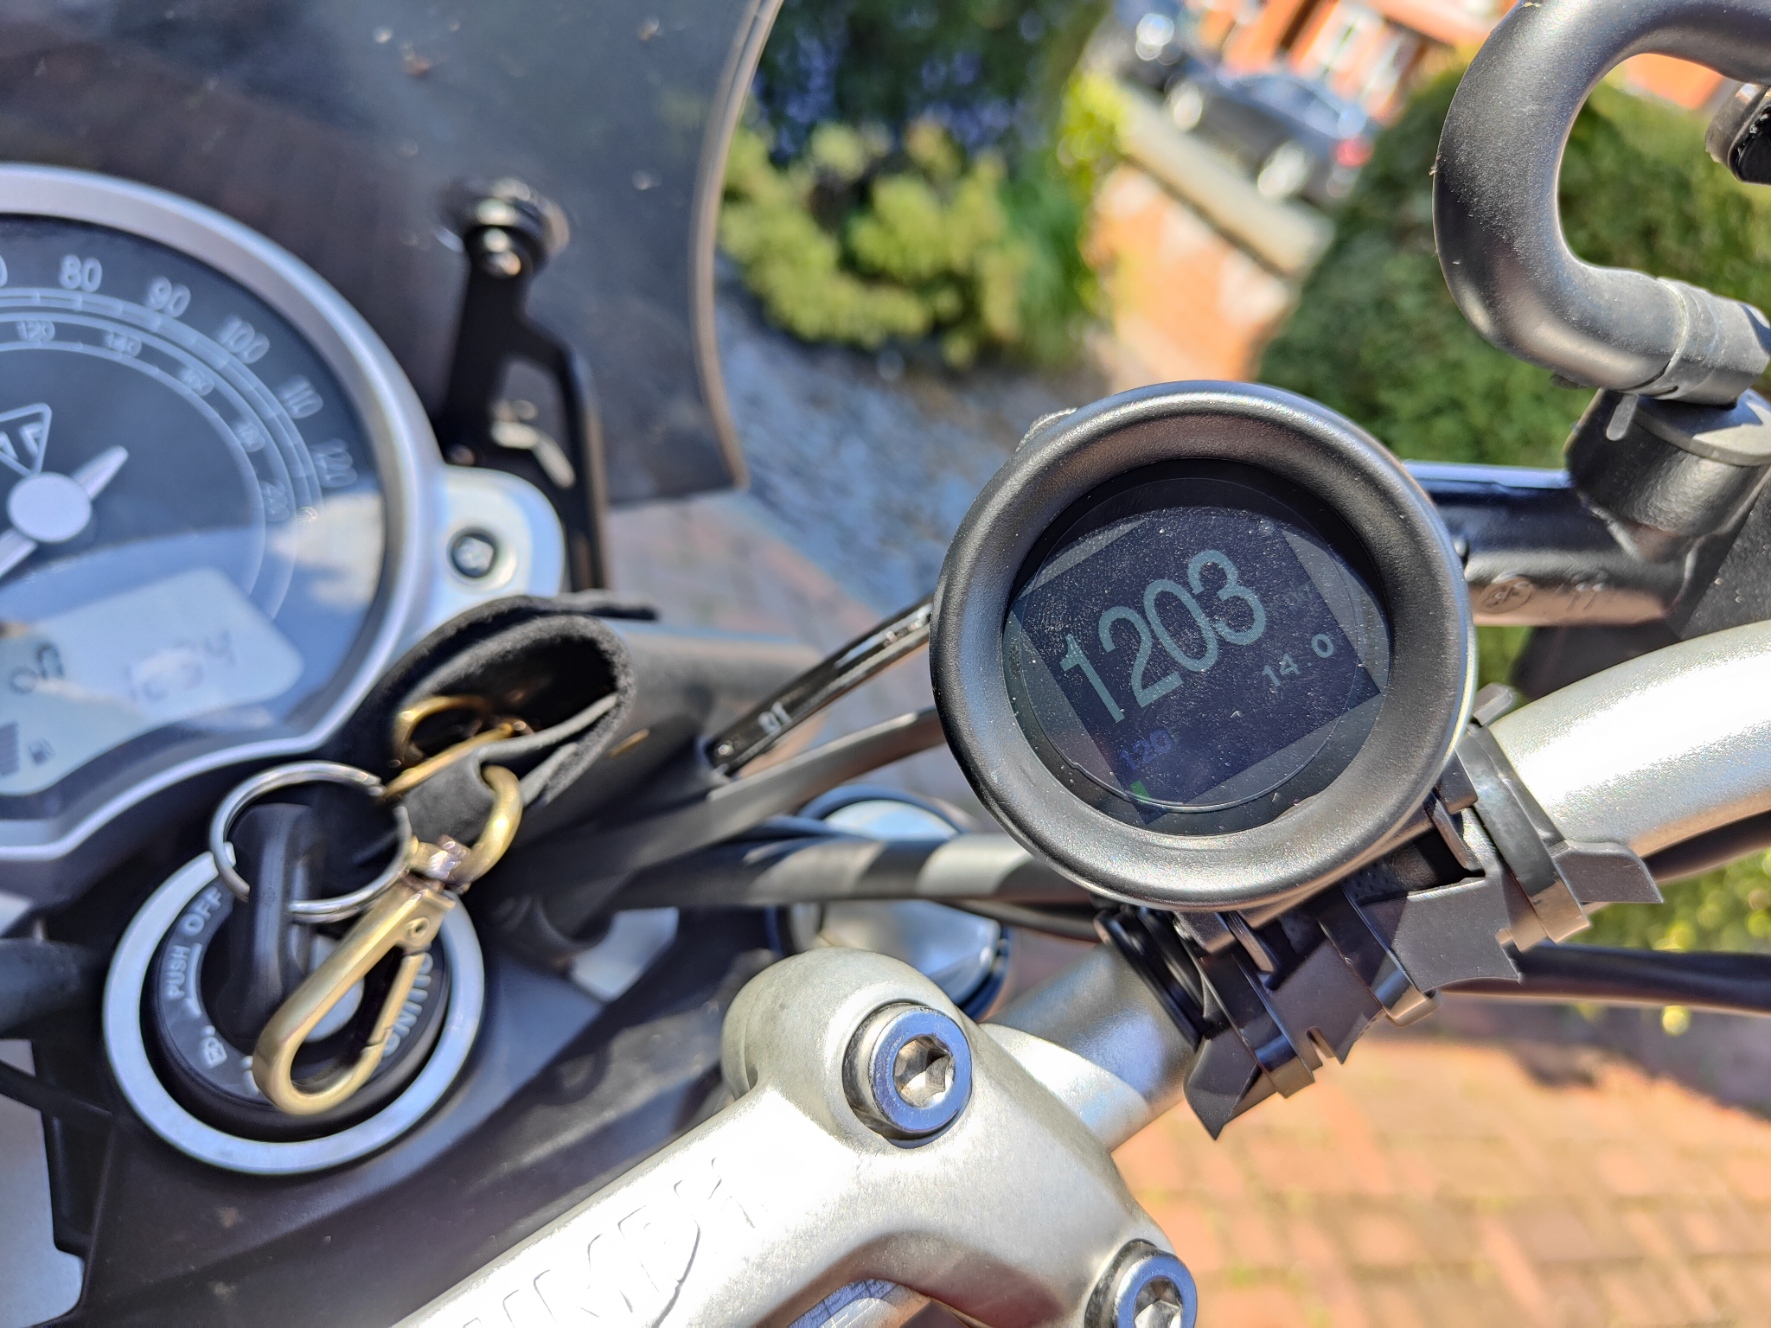
There are a few OBDII readers on the market, largely meant for the car market. I grabbed this cheap thing from AliExpress, but there are equivalents on Amazon and so on. Setup is trivial: you connect it to the port, turn on the bike, and it just works, letting you choose what to display. You turn the bike off and the display shuts down automatically, so your battery is not drained. Nice!

Finding a location for the wire is basically the same as for the USB you also find under the seat; if you've wired it up to a handlebar mount for phones, as I have, you can basically do the same - it's actually easier here, since you can push it further back with the other cables.

Unresolved issues

There are a few annoyances though, due to the fact that this is fundamentally a product for cars:

  • The display can be a bit hard to see in daylight, particularly when the sun shines directly on it.
  • You'll need to hack together a mounting system; the stand that comes with the product is meant for car dashboards. You can see my solution in the pic of the display above - not the most beautiful, but it will do for now; I plan to revisit it at some point.
  • It's not waterproof. In the rainy North of England, this is a significant problem. I'm trying to think about solutions; if you have any suggestion, feel free to drop a comment.

All these issues could be solved if manufacturers started making readers dedicated to the motorbike market. I hope that happens at some point, because it would be awesome - it would free consumers from the tiranny of OEM displays.

Hot Engine is Hot

Last bit of advice: while you're testing, be careful with your dangling cables! As you can see from the pic below, I mistakenly left mine over the exhaust for a few seconds and... well. Amazingly, it still works!

30 May 2022

On OneStream

If you follow me on LinkedIn, you might have noticed that, about two years ago, I joined OneStream.

I've since refrained from writing about it, for a number of reasons: the product is massive, so it took a while to get to grasp with it; my new role kinda constrained what I could talk about; and I thought I wasn't particularly well-qualified yet to speak about the subject.

I recently attended the Splash conference for the first time. One of the things I brought home from San Antonio (together with a certain virus most people thought defeated) was the belief that, by now, I actually know a few things about OneStream - and there is a big hunger for that knowledge among clients and partners. The leadership is aware of this, so it was easy to get the greenlight on a few related projects.

This means that I'll be writing a bunch of posts in the next couple of months, on OneStream-related subjects. They might not be published here, but wherever they end up, I'll make sure to link them from here. I'm a geek, not a marketer, so they will be technical posts about getting stuff done; there is already plenty of material on why you should use OneStream for your planning and financial consolidation needs - what people need is to learn how you can do that, and that's where I'm going to help.

In the meantime, if you'd like me to cover a particular topic, feel free to reach out (here, on LinkedIn, or at my OneStreamSoftware.com address (glacava@).

12 March 2022

Detecting Badger2040 boards and automating uploads

I recently bought a bunch of Pimoroni Badger2040 boards, and they are a lot of fun.

The Badger is basically a small microcontroller (the Raspberry Pico) with an eInk display, in the size of a typical office badge. It has a few buttons you can interact with, when powered, but because of eInk it doesn't actually need to be powered all the time - you can just set it to the desired screen, turn off the battery, and the screen will stay as it was more or less forever.

The fun bit is that it can run MicroPython, so programming it is a breeze. You don't have to deal with all the scary vagaries of C/C++; just write your Python scripts, save them to the board, and run them. Sweet!

There is already a fairly comprehensive tutorial on how to get started with Badger2040, but (like most Pico-related documentation out there) it assumes you're happy to use Thonny, an editor focused on the micropython ecosystem, in order to move files to the board. With all due respect, Thonny is a very limited editor, and it gets recommended only because it's the most intuitive when it comes to managing files on the Pico. I'm much happier when I live in my beloved PyCharm, but its MicroPython plugin is somewhat limited and requires manual interaction, so I investigated a strategy to automate the basic stuff directly from Python on my laptop.

The first step is detecting the board. It appears to the operating system as a serial port, so we have to list the available ports and find the one that looks like our guy.

 # badgerutils.py
import serial.tools.list_ports as list_ports
from serial.tools.list_ports_common import ListPortInfo
  
def is_badger(port: ListPortInfo):
    """ decide if the port looks like a Badger2040 """
    # mac, but other systems will probably be similar,
    # just add other "if" blocks for windows etc
    if sys.platform.startswith('darwin'):
    	# you should be more thorough, 
        # might want to check VID etc, but this will do for dev
        if port.manufacturer and \
           	    port.manufacturer.lower().startswith('micropython'):
            return True
    return False
  
def get_badger():
    """ loop through all the ports and find our board """
    ports = list(list_ports.comports())
    for p in ports:
        if is_badger(p):
            return p

The next step is where things get a bit hairy. Interacting over the serial port is not everyone's idea of fun, so we better stand on the shoulder of geeky giants if possible. We could dig through Thonny's code, but it's long and complicated and meant to support a lot of scenarios we don't really care about. Instead, we can reuse a little utility called ampy, which is slightly old but fairly robust and (more importantly) self-contained and easy to understand.

Ampy includes a couple of modules to interact with a micropython board. You can have a look at the functions found in its cli module to figure how to wrap them, but here's a simple approach to start pushing files to the board - some of the code is lifted almost entirely from ampy.cli, but it's MIT-licensed, so you can do that (just mention the original copyright notice somewhere, if you publish it!).

# BadgerManager.py
  
from serial.tools.list_ports_common import ListPortInfo
from ampy.files import Files, DirectoryExistsError
from ampy.pyboard import Pyboard
  
class MyBadger(Pyboard):

    def __init__(self, port: ListPortInfo):
        super(MyBadger, self).__init__(port.device)
        self.files = Files(self)

    def upload(self, file_path: Path, dest_path: Path):
        """ upload file or directory to board """
        if file_path.is_dir():
            # Directory copy, create the directory and walk all children 
            # to copy over the files. 
            for parent, child_dirs, child_files in os.walk(file_path):
                # Create board filesystem absolute path to parent directory.
                remote_parent = posixpath.normpath(
                    posixpath.join(dest_path, os.path.relpath(parent, file_path))
                )
                try:
                    # Create remote parent directory.
                    self.files.mkdir(remote_parent)
                except DirectoryExistsError:
                    # Ignore errors for directories that already exist.
                    pass
                # Loop through all the files and put them on the board too.
                for filename in child_files:
                    with open(os.path.join(parent, filename), "rb") as infile:
                        remote_filename = posixpath.join(remote_parent,
                                                         filename)
                        self.files.put(remote_filename, infile.read())
        else:
            # File copy
            # check if in subfolder
            if len(dest_path.parents) > 1:
                # subfolder was specified
                # each parent has to be created individually,
                # because of ampy limitations
                for d in sorted(dest_path.parents)[1:]:  # first is /, discard
                    self.files.mkdir(d)

            # Put the file on the board.
            with open(file_path, "rb") as infile:
                self.files.put(dest_path.absolute(), infile.read())

    def ls(self, dirname='/', recurse=True):
        """ List files on board """
        dirpath = dirname if type(dirname) == Path else Path(dirname)
        return self.files.ls(dirpath.absolute(),
                             long_format=False, recursive=recurse)

Putting both things together we can interact very easily with the board like this:

from badgerutils import get_badger
from BadgerManager import MyBadger

# Note: in real life, remember to manage error conditions ! 
port = get_badger()
board = MyBadger(port)
board.upload("./something.txt", "/something.txt")
assert('/something.txt' in board.ls())

Happy hacking!

06 June 2020

Better access to special characters with AutoHotkey on Windows

EDIT 2020-06-21: I tweaked the layout a bit, and updated screenshot and scripts.

When you're trying to improve your typing skills, there are quite a few things you can do: learning to touchtype, getting an ergonomic / split keyboard, or moving to a better layout than QWERTY. However, if you're like me (small hands, short pinkie), chances are that none of these will be of much help when you have to type a lot of special characters, for example in programming. That's because special characters are typically hard to reach. Most layouts banish them to the edges of town, leaving them almost entirely to the right pinkie and to shift+<number>, which forces your hands to wander very far from the home-row on which your muscle-memory is based.

I'm currently experimenting with a solution to this state of things. Thanks to a wonderful little program called AutoHotkey, you can tweak your keyboard in great ways; what I decided to do was to leverage the largely-unused (but very easy to reach) CapsLock. I basically turned CapsLock into a new meta key (which is not Ctrl, Alt, AltGr, Win or Cmd), allowing me to get a completely blank layer that is independent of any existing key or shortcut. I then associated the most easily-reachable keys to the most common (and hardest to reach with typical layouts) special characters I need.

The result is that, by pressing capslock+<home-row-key>, I now get special characters with less effort and less wandering.

What you see above is the layout I'm currently using. It's not perfect, but the principles are:

  • optimize the position of keys I find least-reachable and most-used on a regular layout
  • privilege right-hand keys, which are the most natural companions to a left-hand meta
  • privilege opening brackets, as editors typically auto-close them
  • try to minimize "wandering" of hands from home-row as much as possible

I've also added a numpad on CapsLock+Shift, which is useful on laptop keyboards. Yes, you often have a hardware NumLock mode, but I never use it because I find it risky (if you mistakenly leave it on and the screen locks, good luck typing your password).

NOTE: the ALT+` combo is a "mac-ism" - it's actually AltGR+` on Windows (or Ctrl+Shift+Alt+`). It's the shortcut to prepend to a vowel to get a grave-accented character. I'm Italian, so I use it to type accents on a US keyboard.

I wish someone would come up with a "standard" meta-layout like this, with some real thought to ergonomics and frequencies; then again, programming languages can vary so much (for example there are lots of $ in Perl, but very few in Python) that I guess it would be difficult to appease everyone.

Here is a AutoHotkey script for QWERTY and AutoHotkey script for COLEMAK (that's actually what I use). If you install AutoHotkey, just save the script as AutoHotkey.ahk in the resulting installation folder and it will be automatically executed when you start the program (it can also be run at startup).

If you are on macOS/OSX, things are a bit more awkward; I might cover that in another post at some point, but my solution there relies on a smart external keyboard. Happy hacking!

03 April 2020

Django + PostgreSQL + Docker-Compose: a few gotchas

A lot of the tutorials out there make it look like it's trivial to set up a development environment with Django, Postgres and Docker. That never quite matched my experience; you always end up knowing too much about docker, and there are a few gotchas that most people typically fail to mention. The following are a few specifically related to Postgres and Django, which I'm writing here because I tend to forget them every time I start a new project...

A running container is not a running database

Docker-compose will happily report a container as "up" even though it's busy doing init work. With postgres, this means that a container might look "up" when really it's still creating the actual db instance, so app connections might well fail.

A good workaround is to use pg_isready, like this :

#!/usr/bin/env sh

docker-compose up
until pg_isready -d your_pg_db -h your_pg_host \
                 -p your_pg_port -U your_pg_superuser
do
    echo "Waiting for db to be available..."
    sleep 2
done
# now we can do actual work, like db migrations
...

Don't run; exec

A lot of howtos state, more or less, "if you want to run something in an instance, use docker-compose run some_machine some_command". This is misleading. run will create a new ancillary container, which will run in parallel to any other container of the same type that might already be up. If you want to execute an ancillary process inside an already-running container, use docker-compose exec some_machine some_command instead. This will ensure you are "logged on" the running container.

While coding, don't copy; mount

Many will tell you that you need to ensure reproducibility; and as such, your code should be copied or checked out to the instance in Dockerfile, i.e. at build stage. That is a huge drag on development, since you need to rebuild the whole image on every minor change. It is annoying and slow even with multi-stage builds.

Instead, you can mount your actual source directory as a volume, and exploit all the goodies that make development tolerable, like Django's autoreload features. Make your docker-compose.ymllook like this instead:

services:
   your_app_machine:
      volumes:
         - type: bind
           source: /host/location/of/src
           target: /container/location/of/app
   ...

When you want to run tests or go to production, use a second Dockerfile that inherits from the first (with FROM) and actually copies data (or more likely checks it out via git), without the volume definition.

Know your tools

This is not really specific to docker! Master your tools in depth, it will help. I honestly didn't know that JetBrains PyCharm can now configure the interpreter running in a Docker container as the main one for the project, which makes a lot of things easier (debugging, REPL etc). Extremely helpful!